

Kar98k Photogrammetry Tests (Ongoing)
Project Overview
The goal of this project is to leverage photogrammetry technology to create high-quality hero assets, with a specific focus on capturing the intricate details of a Karabiner 98k rifle. By utilising photogrammetry techniques, I aim to capture both the organic (wood) and hard-surface materials of the rifle, resulting in a realistic and visually appealing asset.
This project is part of a broader endeavour to develop a comprehensive environment in Unreal Engine. The photo-scanned rifle asset will serve as a key component within this environment.
Responsibilities
Scanning, processing, and clean-up.
Software Used
Substance 3D Sampler, Substance 3D Painter, Autodesk Maya.
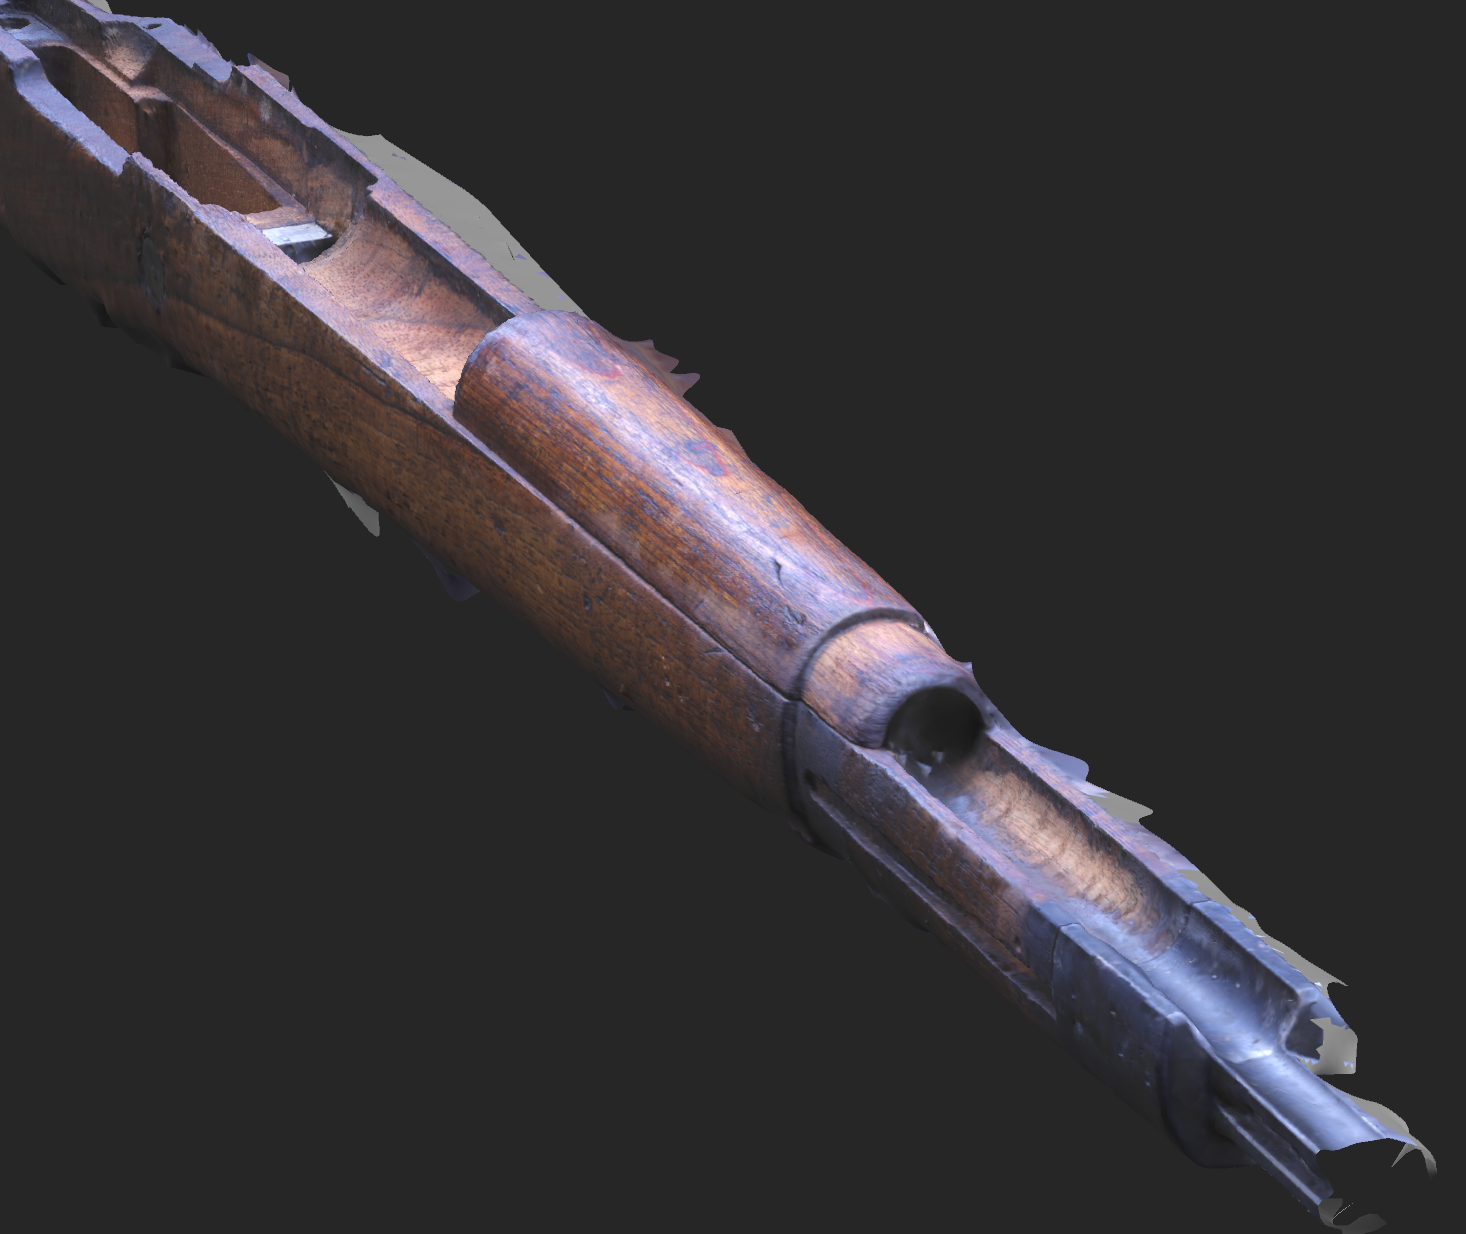
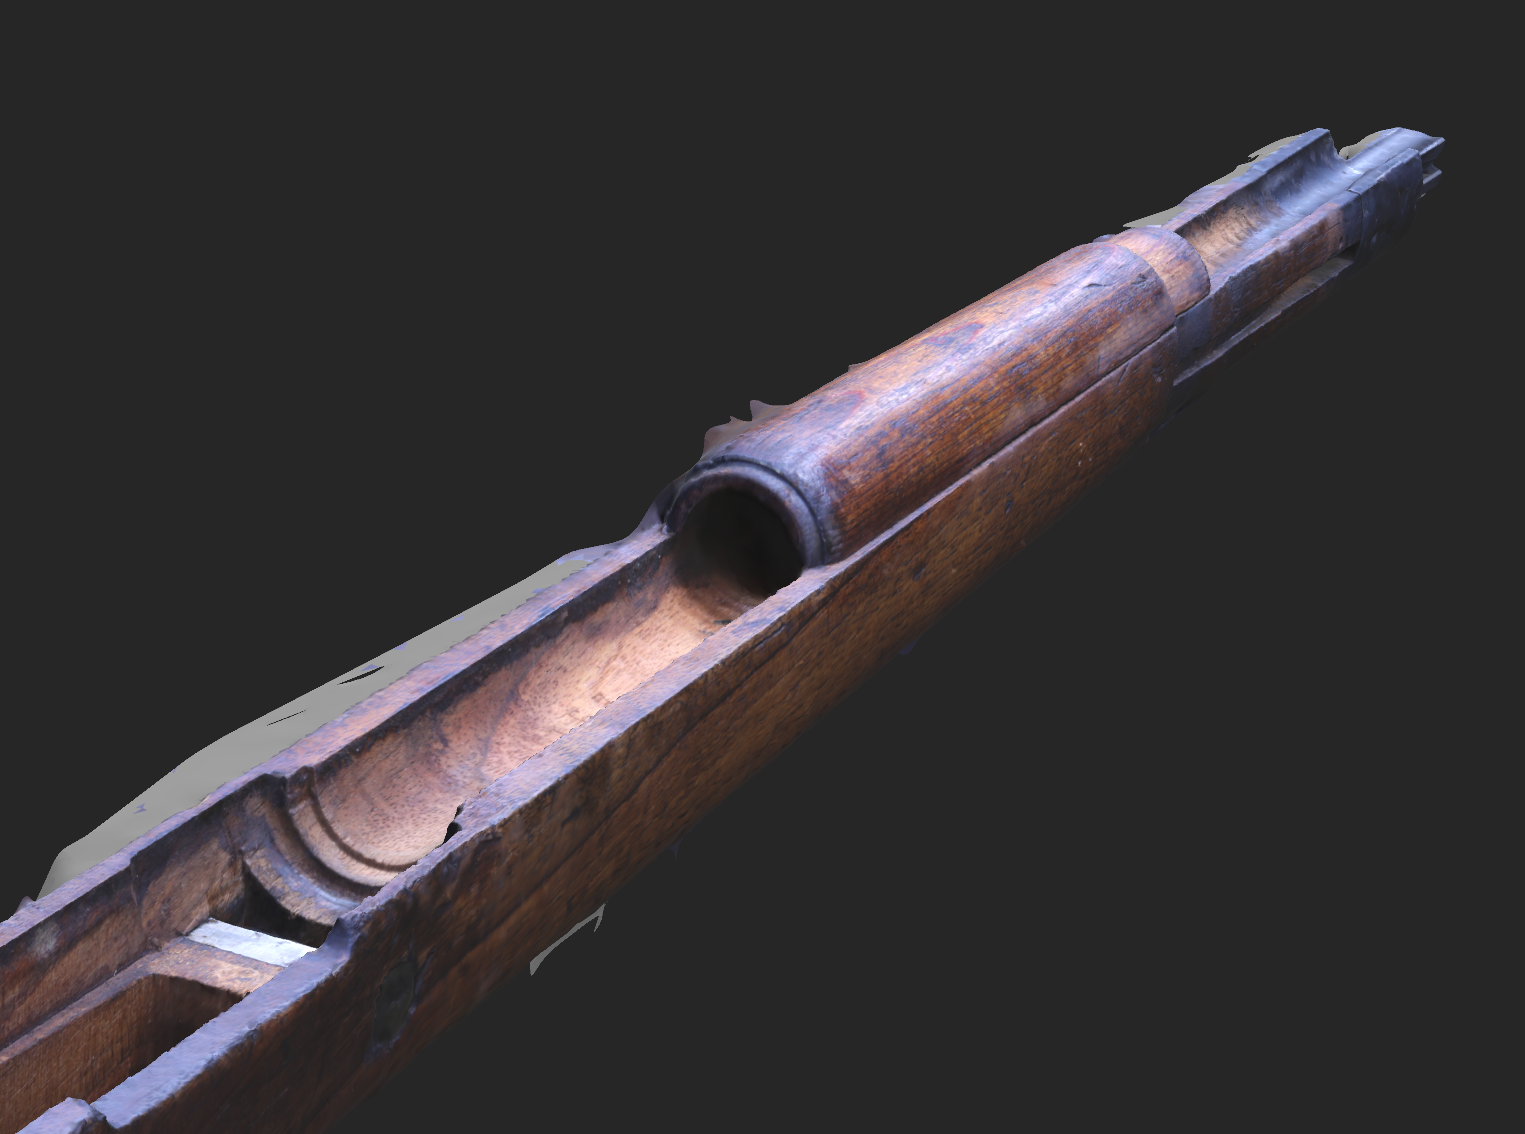
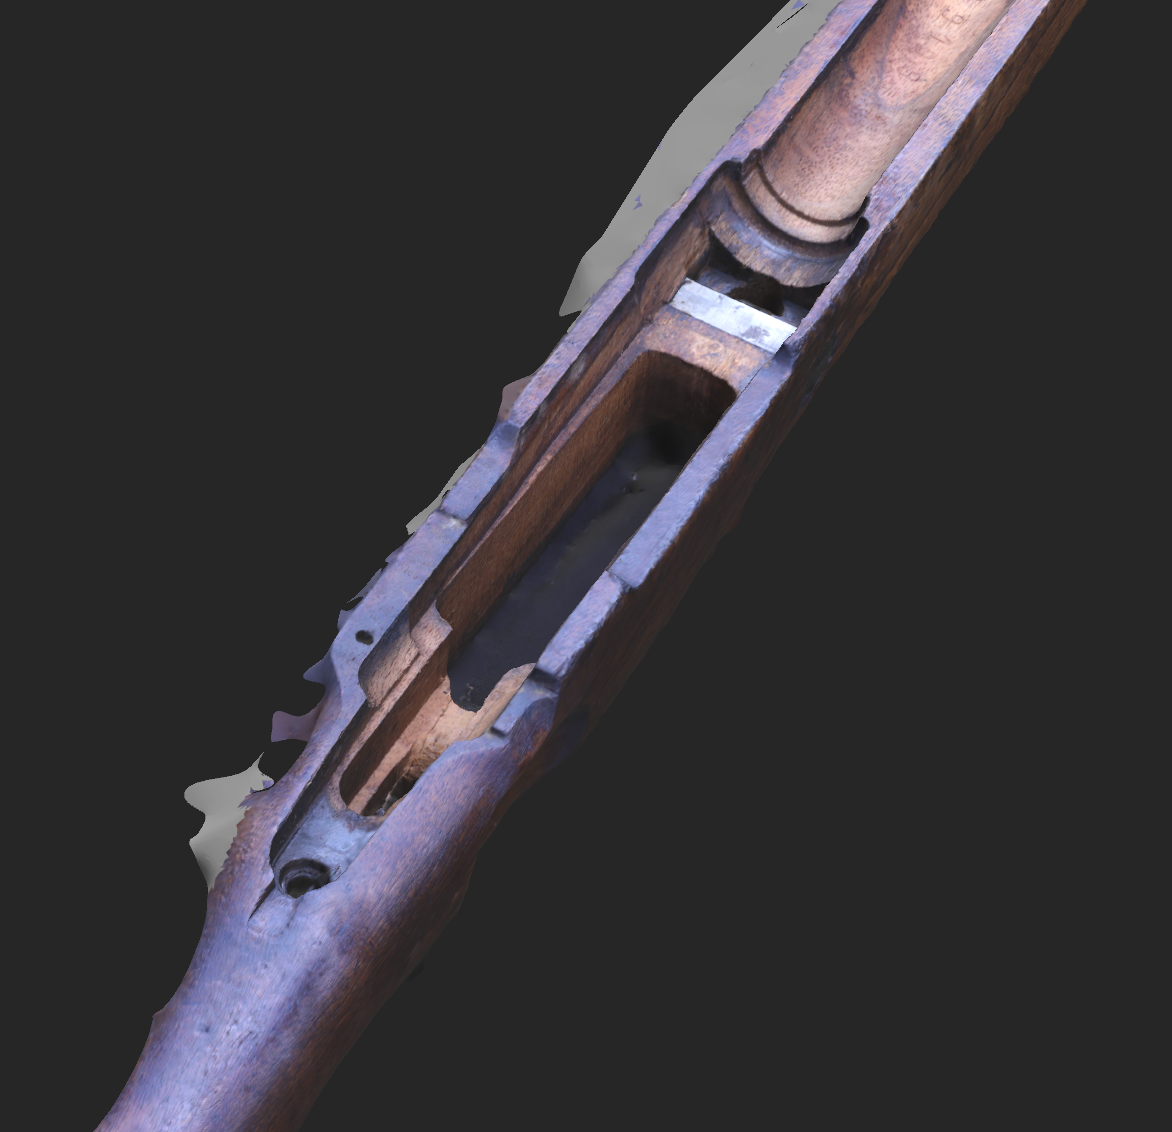
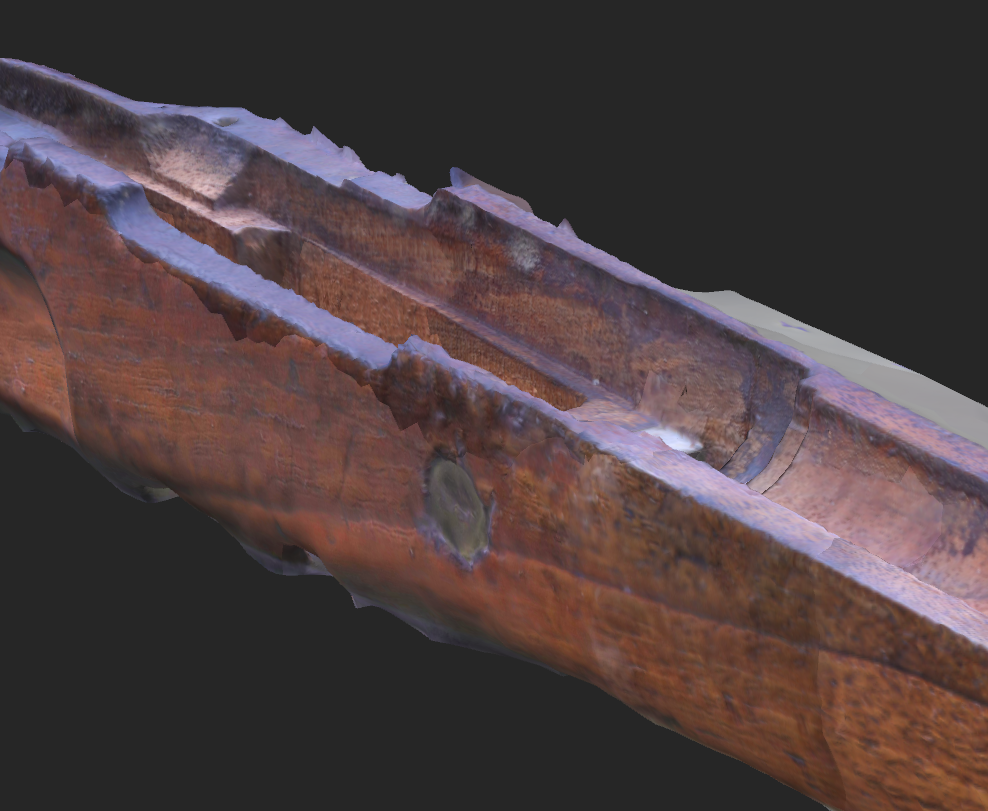
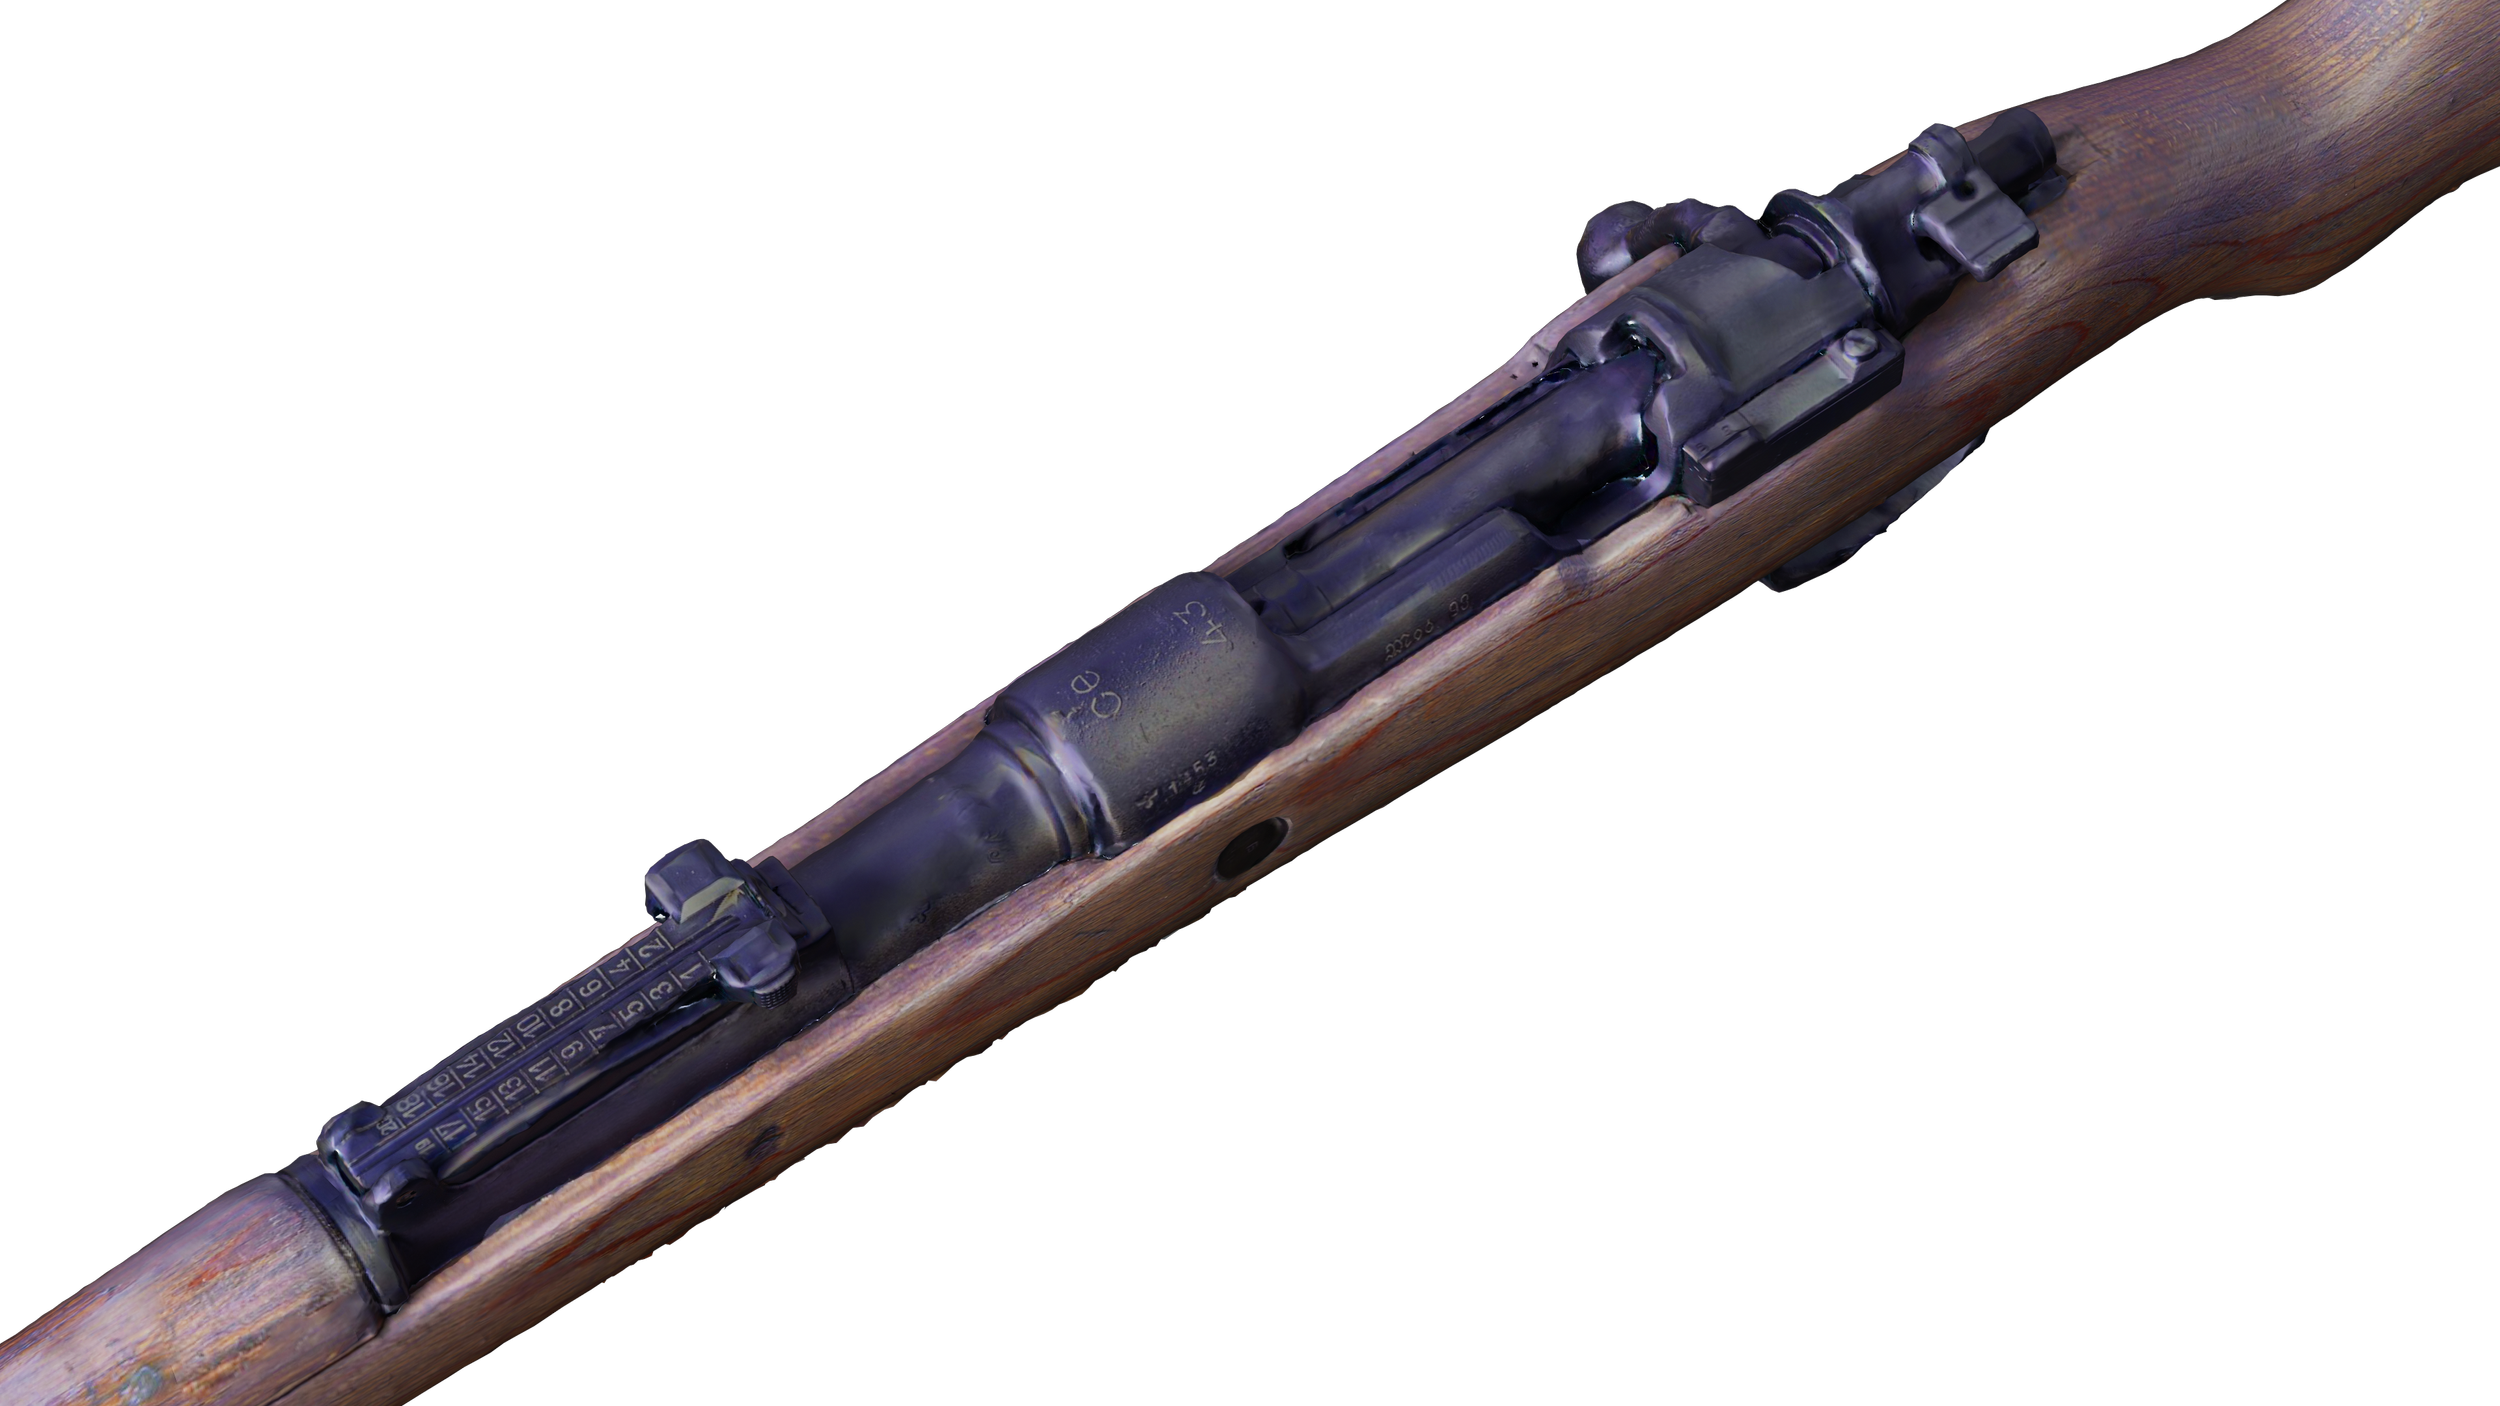
Latest Renders


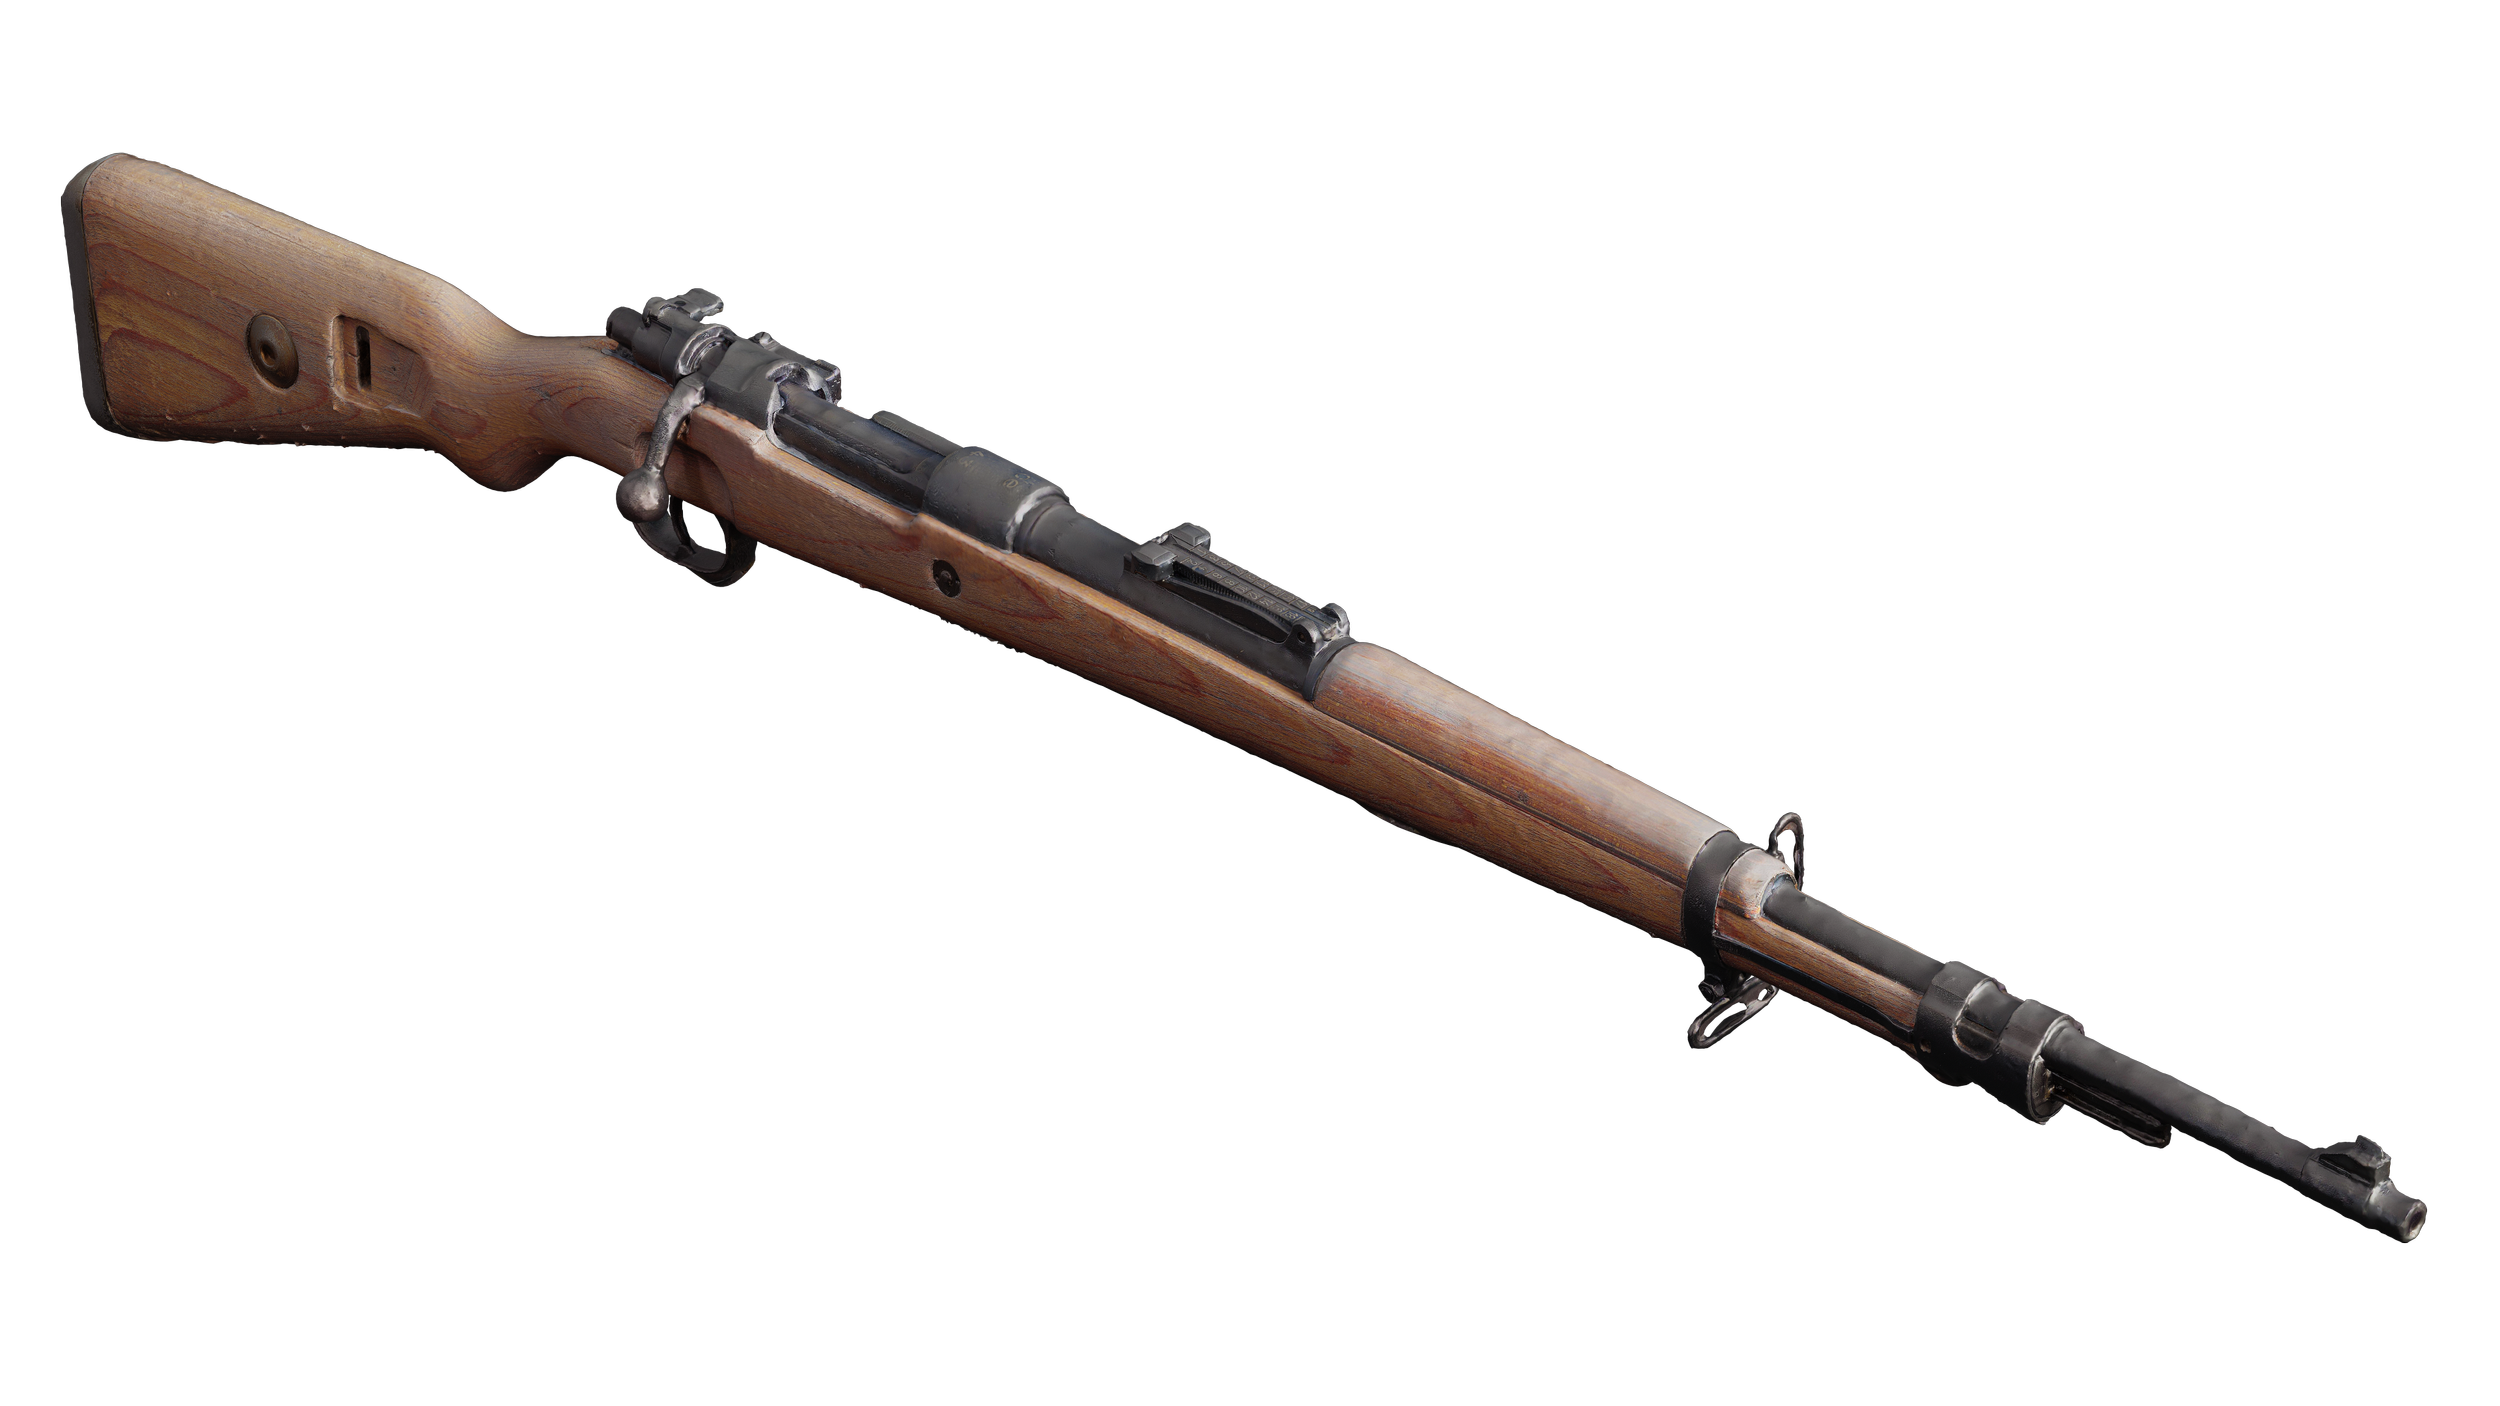

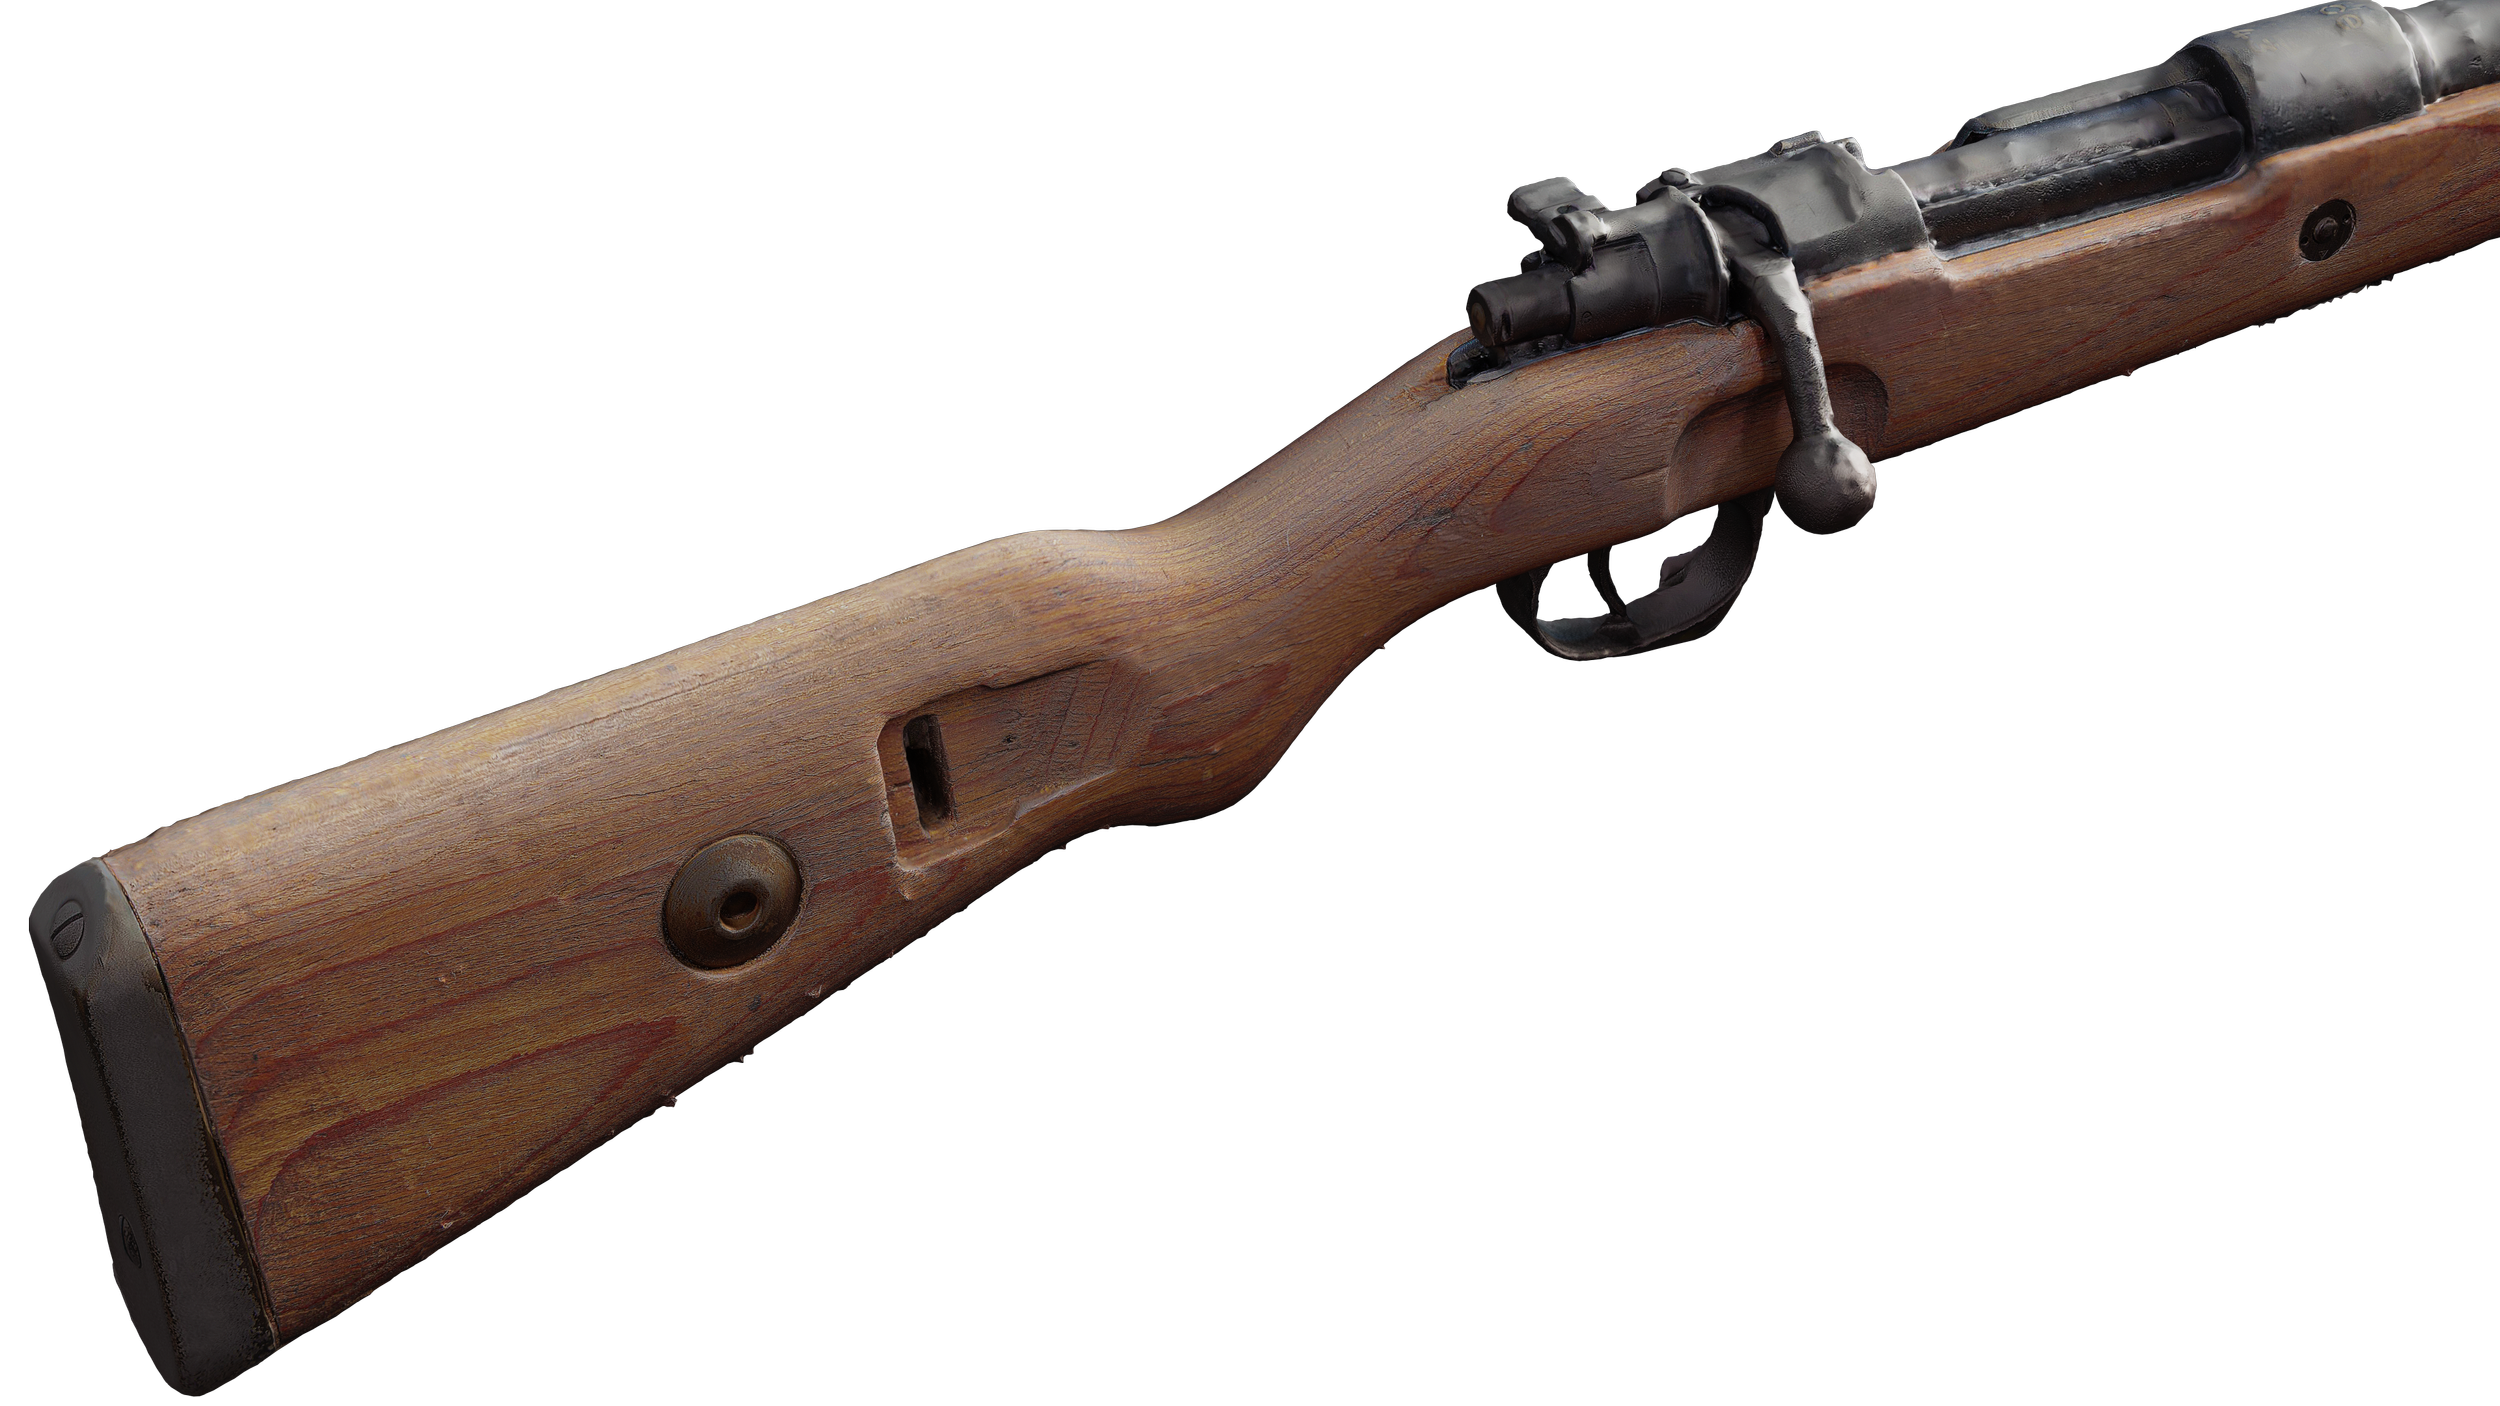

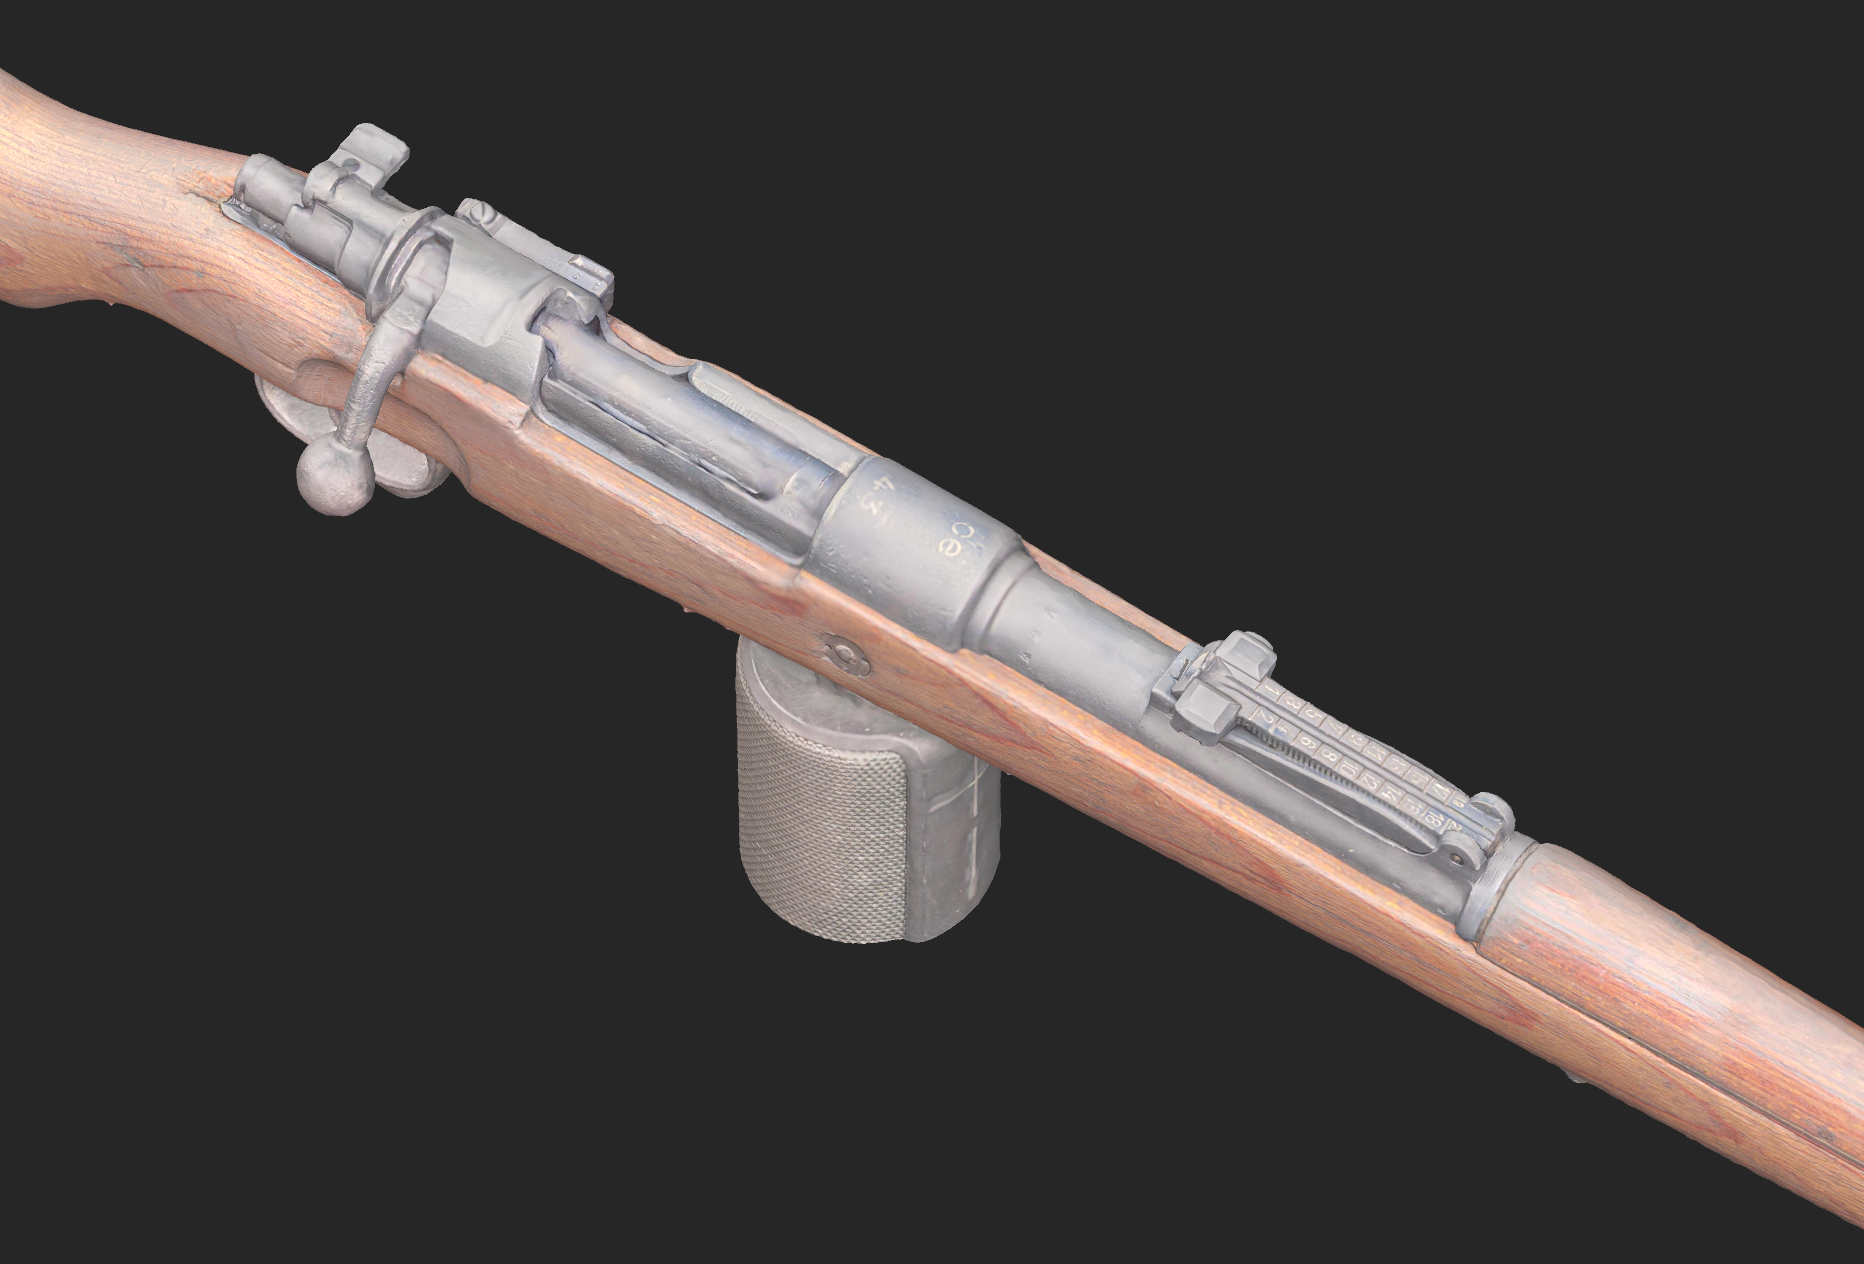
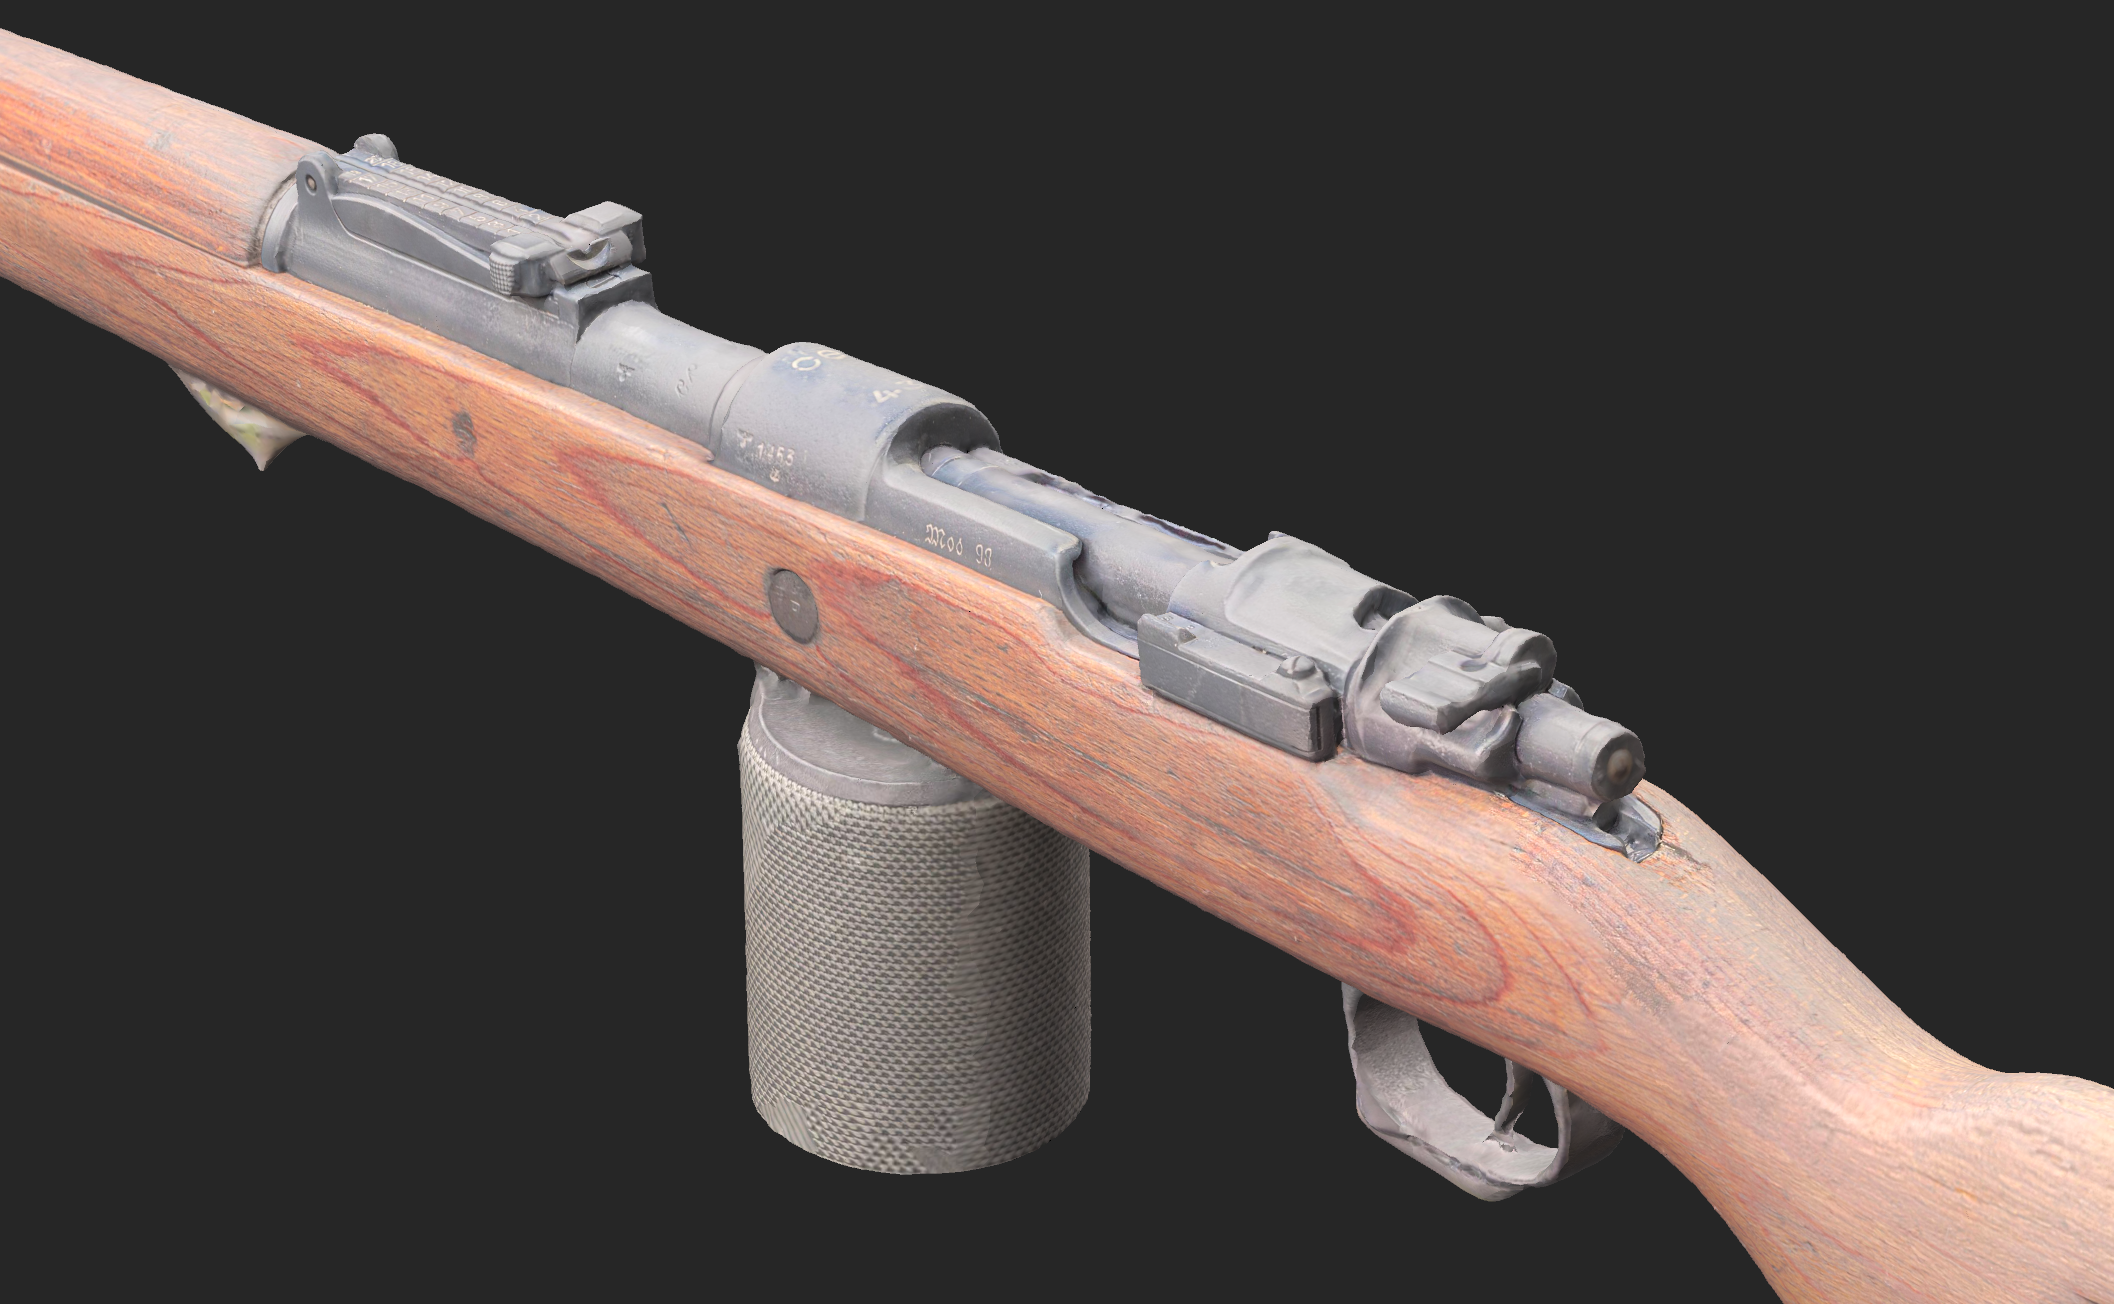
Breakdown
Inspiration & Context
The context for this project emerged from the opportunity to handle a mid-war WW2 Karabiner 98k rifle, which possessed a unique combination of organic and metallic qualities. As a hard-surface artist with a strong curiosity about modelling firearms, I seized the chance to create something meaningful with this rifle.
During the 2023 Game Developers Conference (GDC), I attended the Adobe Substance Day talk, where the Adobe team showcased the capabilities of Substance 3D Sampler and other Substance tools. I also had the opportunity to talk to Nikie Monteleone and Laura Vitolina from the Substance Evangelist and art development team. Nikie and Laura heard about my studio project and my interest in scanning a Kar98k rifle as a part of the project and encouraged me to use Sampler for this exploration.
Preparation & Apparatus
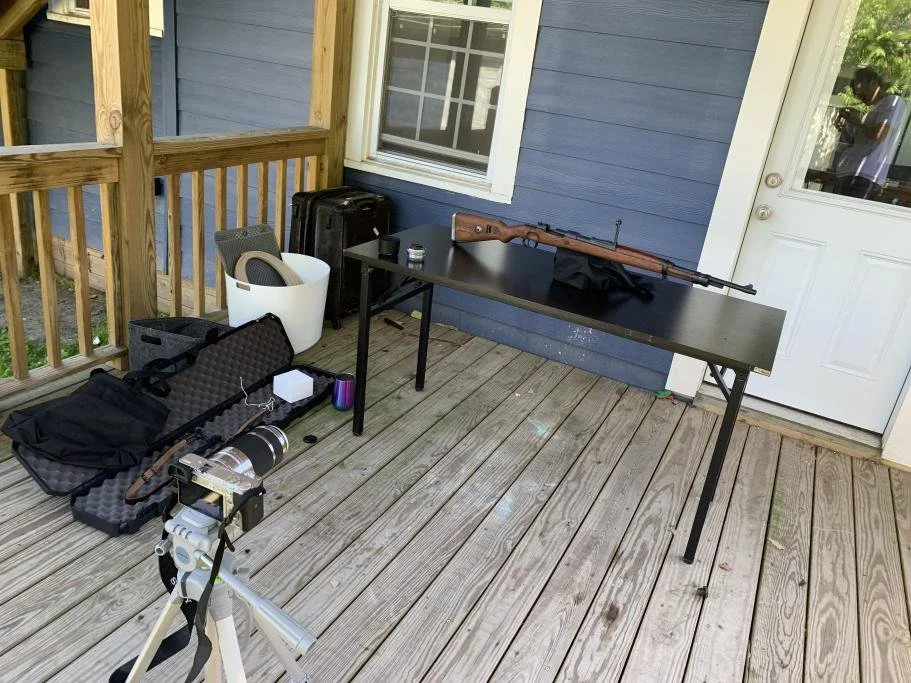
To begin the photogrammetry process, I experimented with various makeshift setups in order to determine the most effective approach. All of my tests were conducted on an overcast day in my backyard. I made use of AESUB scanning spray to lessen the reflective properties of the metallic parts.
The initial setups (shown immediately below) used a Sony Alpha a6000 camera mounted on a tripod with a 55mm lens with manual focus, a shutter speed of 1/6, an aperture of f/8, and an ISO of 200. Unfortunately, these tests yielded unsatisfactory results due to significant blurring and a lack of clear separation between the background and foreground elements. As a result, Sampler incorrectly stitched the photographs together.
Initial Camera Settings
Camera: Sony Alpha a6000 on a tripod
Lens: 55mm lens with manual focus
Shutter: 1/6
Aperture: f/8
ISO: 100

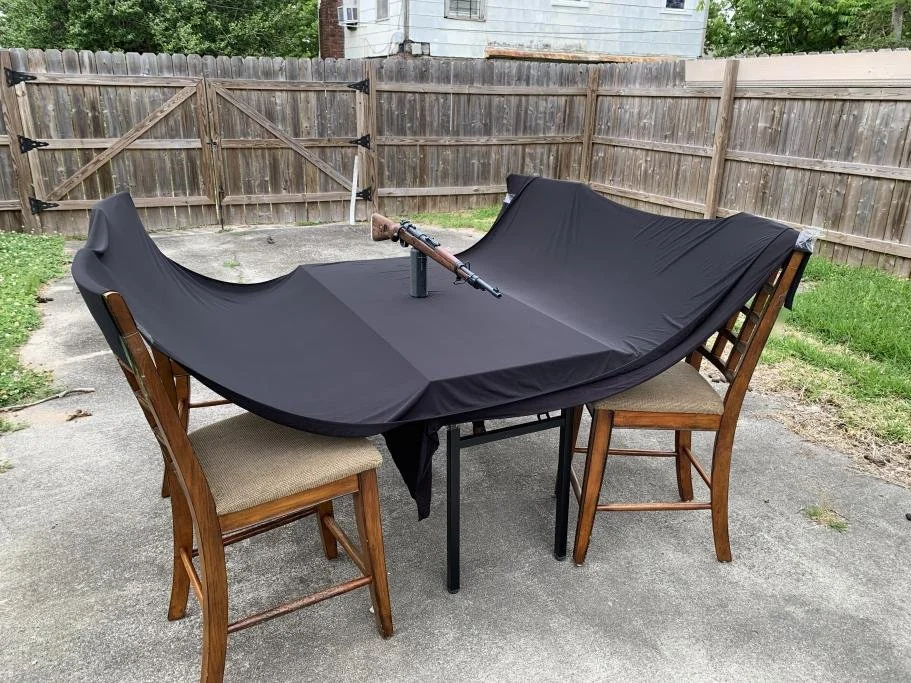
After several unsuccessful attempts with the first two setups, I decided to change my add some polyester cloth elevated by some table chairs to serve as a masking element.
Furthermore, I switched to a Canon EOS R5 camera paired with a 25mm lens, which offers higher resolution with its 45MP sensor (compared to the a6000’s 24MP) with a 25mm lens. With this setup, I maintained manual focus and adjusted the shutter speed to 1/125, the aperture to f/5.6, and the ISO to 200. Additionally, I also transitioned to a handheld shooting technique, allowing me to move around the setup rather than rotating the asset itself.
The results with this revised setup proved significantly better, as Sampler consistently processed and accurately masked the asset from the background element.
Updated Camera Settings
Camera: Canon EOS R5 handheld
Lens: 25mm lens with manual focus
Shutter: 1/125
Aperture: f/5.6
ISO: 200

First Test - Results & Using Lightroom
To refine the setup for better processing by Sampler, I conducted several additional tests. The initial test focused solely on capturing images of the wooden parts of the gun, resulting in 321 photographs. While the results were satisfactory, I noticed excessive baked lighting that needed to be addressed. To mitigate this issue, I used Adobe Lightroom to edit the images, reducing contrast and minimising the influence of sunlight while adding more texture and clarity. However, an unexpected challenge arose when Sampler struggled to stitch the other side of the gun, resulting in only half of a model being processed.
Another issue I ran into with Sampler was that when attempting to increase the polygon count of the 3D model, I encountered the problem of random holes appearing and the baked normals breaking. This issue persisted in subsequent tests, forcing me to stick with the default 50,000 tris.


Second Test - Refined Setup & Stitching Issues
For the second test, I used a complete gun without scanning spray and processed the images in Lightroom before inputting them into Sampler. Additionally, I flipped the gun upside down to ensure the bottom part was captured as well. Surprisingly, this test yielded highly promising results, with a significantly improved scan.
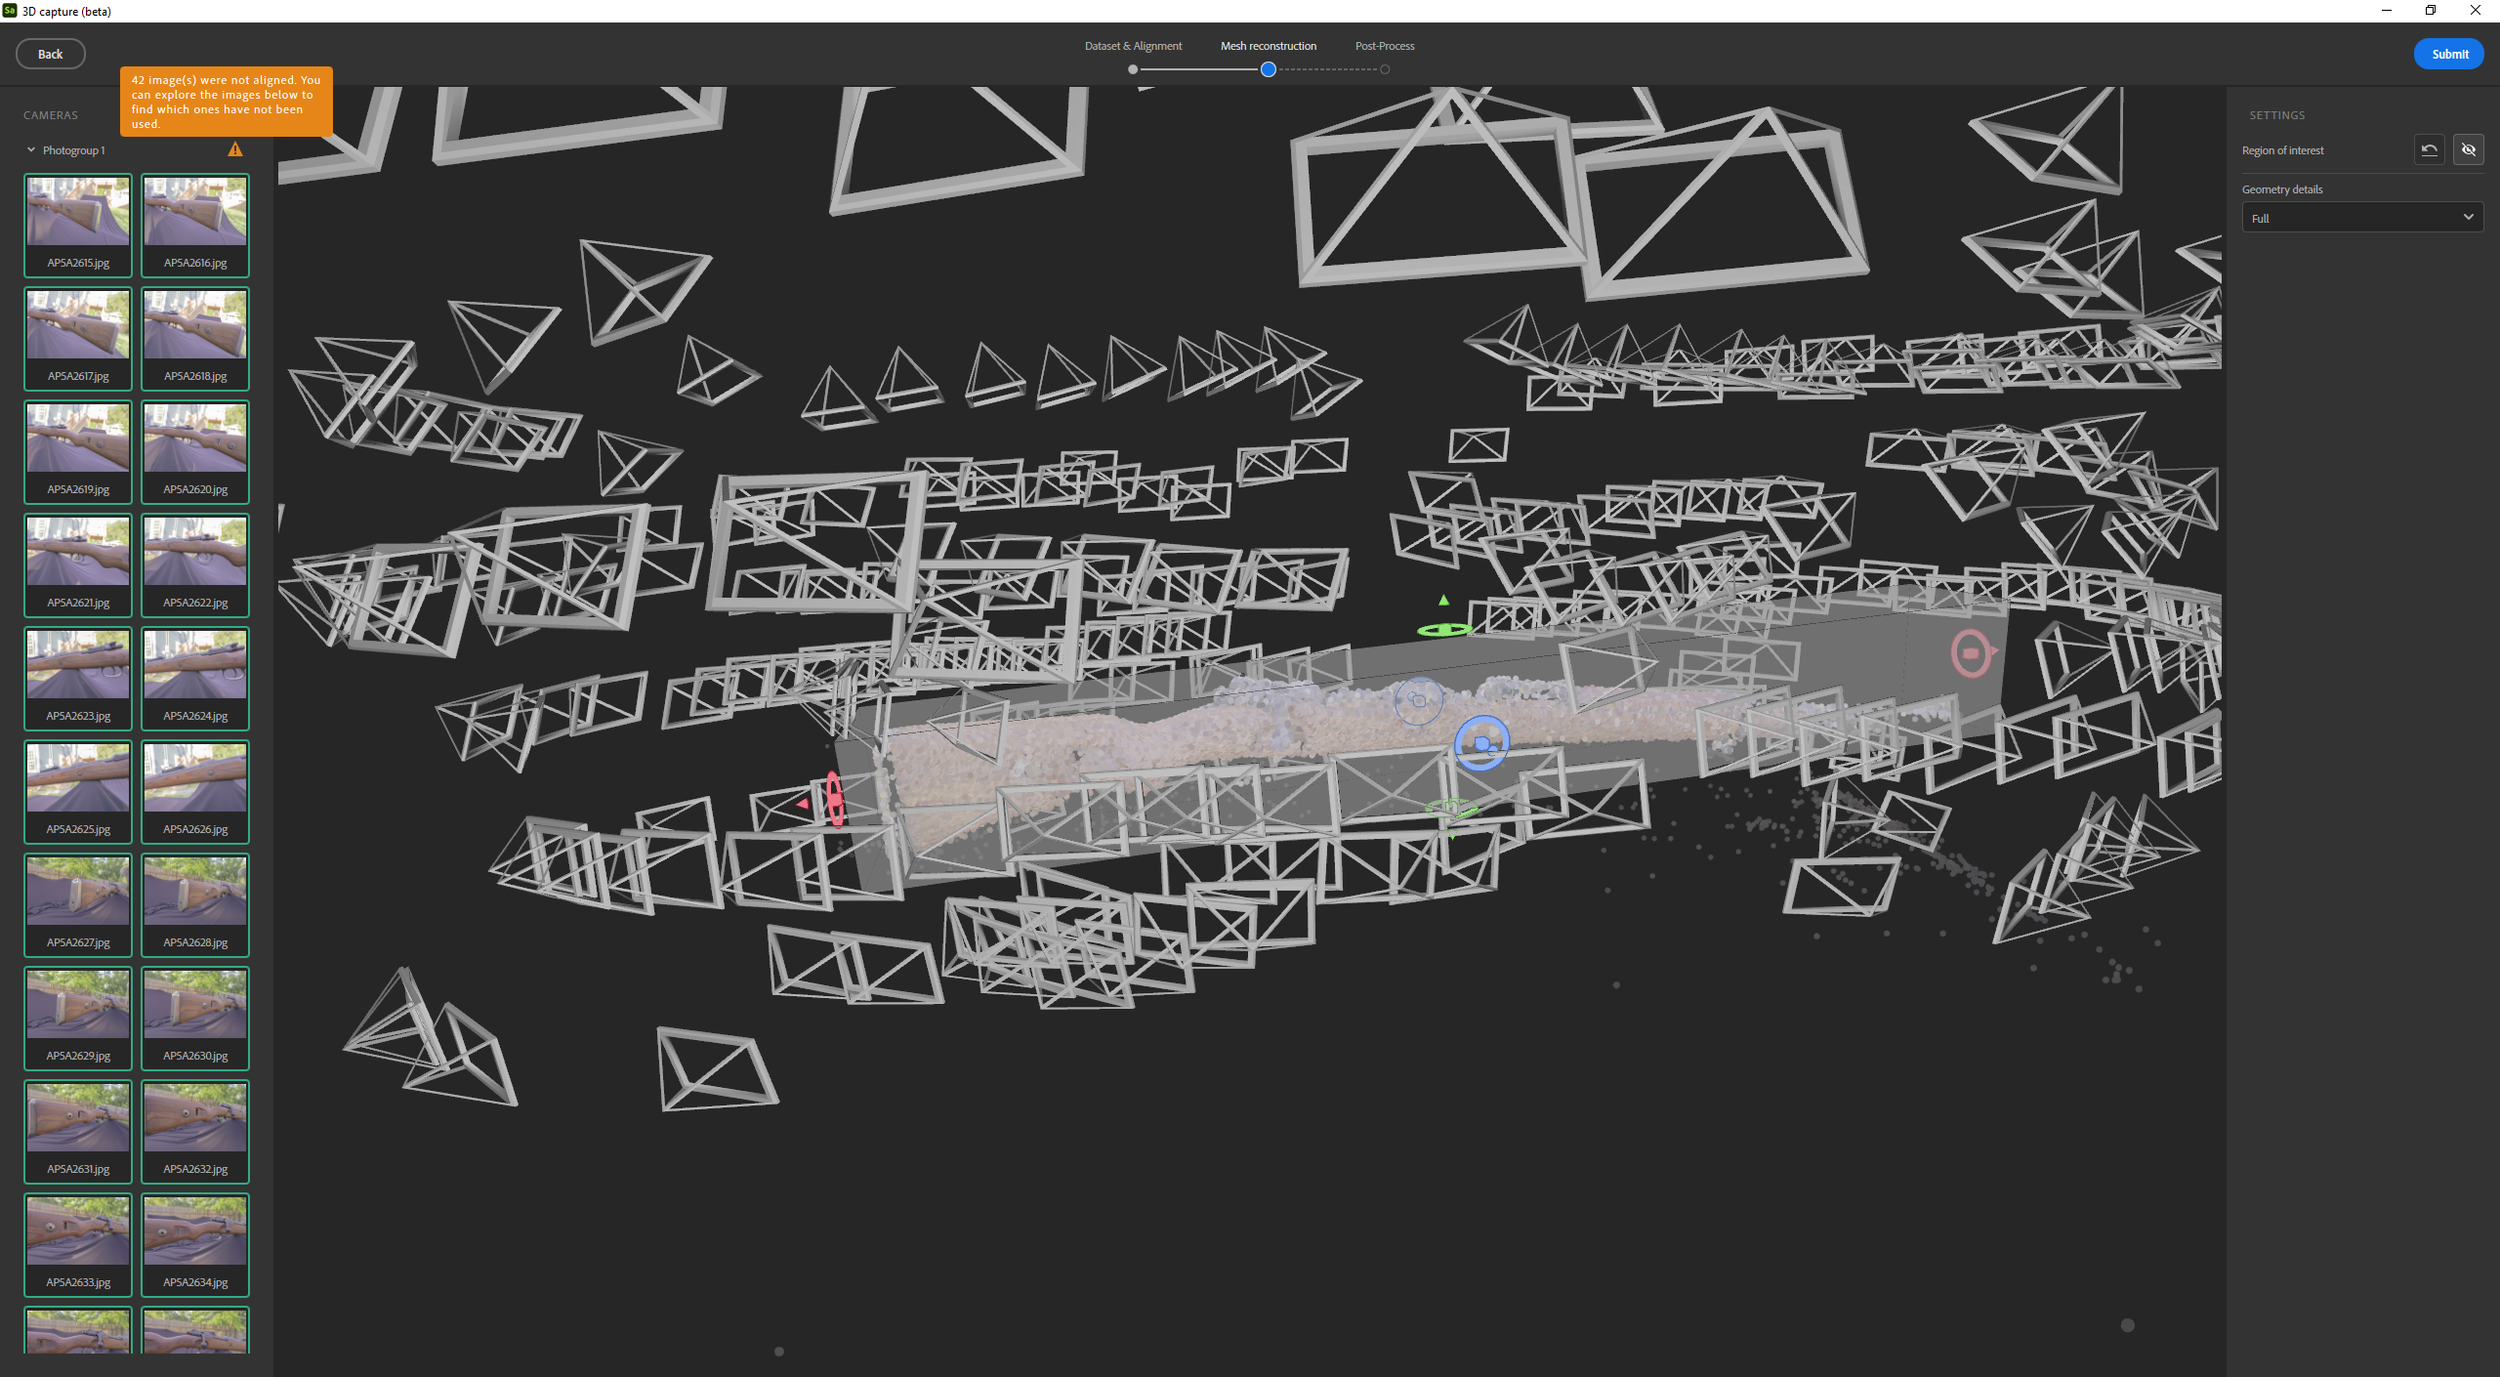
However, out of the 748 photos taken, over a hundred failed to stitch together properly. Similar to the previous test, Sampler struggled with stitching the other side of the mesh, resulting in an incomplete model lacking a bottom section. It's worth noting that the shooting setup and lighting conditions remained consistent.


Third Test - New Issues
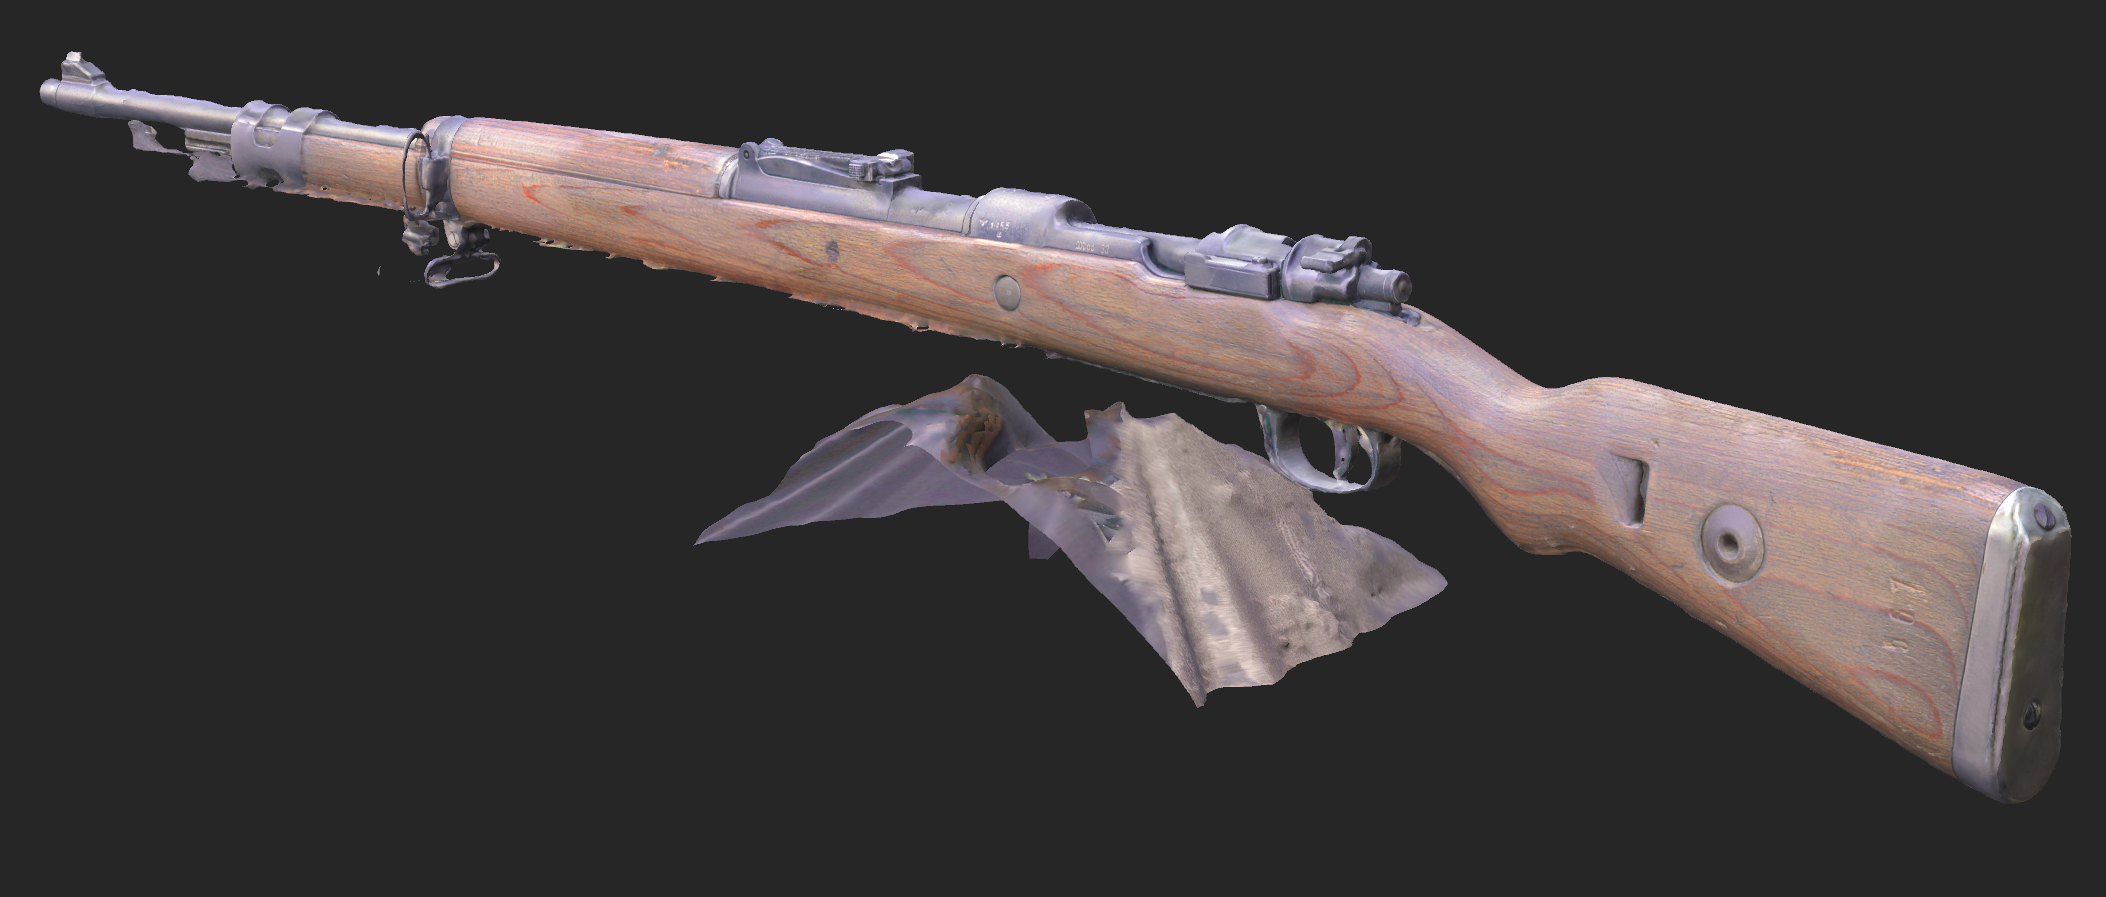
In the third test, I discovered a solution to the stitching issue by dedicating a few additional photos (around 10-20) specifically focused on the barrel and stock of the gun. This allowed Sampler to recognise and properly stitch the two sides together. As a result, this test produced an almost complete scan, encompassing both sides of the gun, with only nine random photos failing to stitch.
However, I encountered another hurdle during the process. Adjusting the point cloud preview of the scan proved challenging, as I lacked the control to mask out the platform. Consequently, a few polygons were lost in the generated mesh due to this limitation. Additionally, I was unable to adjust the alignment of the bottom part of the gun, resulting in an off-axis appearance, which appeared peculiar in the final scan.


Bringing into Substance 3D Painter
After exporting the model as an FBX file with a diffuse map, I proceeded to clean it up in Maya to ensure optimal quality. Subsequently, I imported the model into Substance 3D Painter, where I focused on enhancing its appearance by adding metallic and roughness properties. Although I initially attempted to use Sampler’s Image-to-Material AI feature, I encountered the aforementioned issues with broken normals. Laura also advised against its usage.
With the implementation of the metallic and roughness properties in Substance 3D Painter, the model truly began to come together. The additional texturing and material adjustments added depth and realism to the scanned object, bringing out its organic and metallic qualities in an impressive manner.


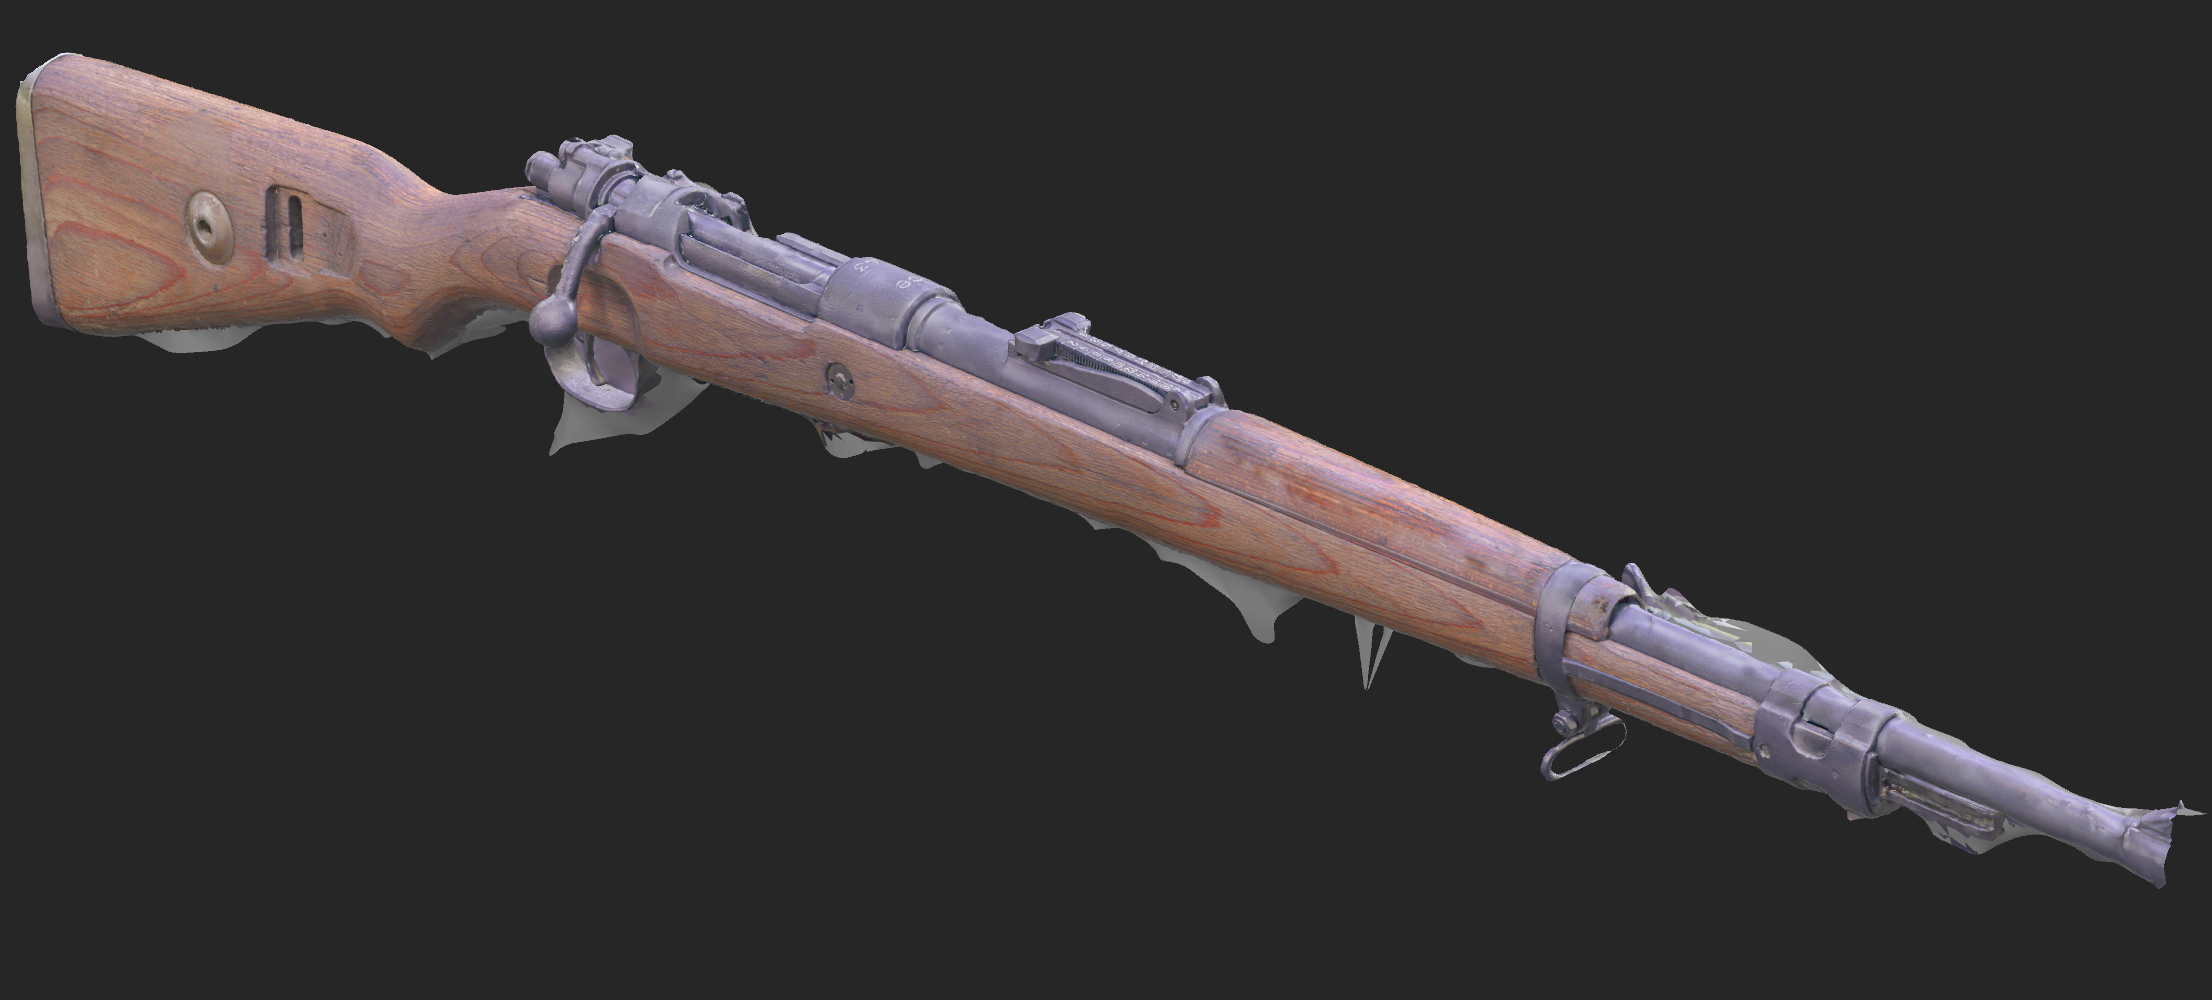
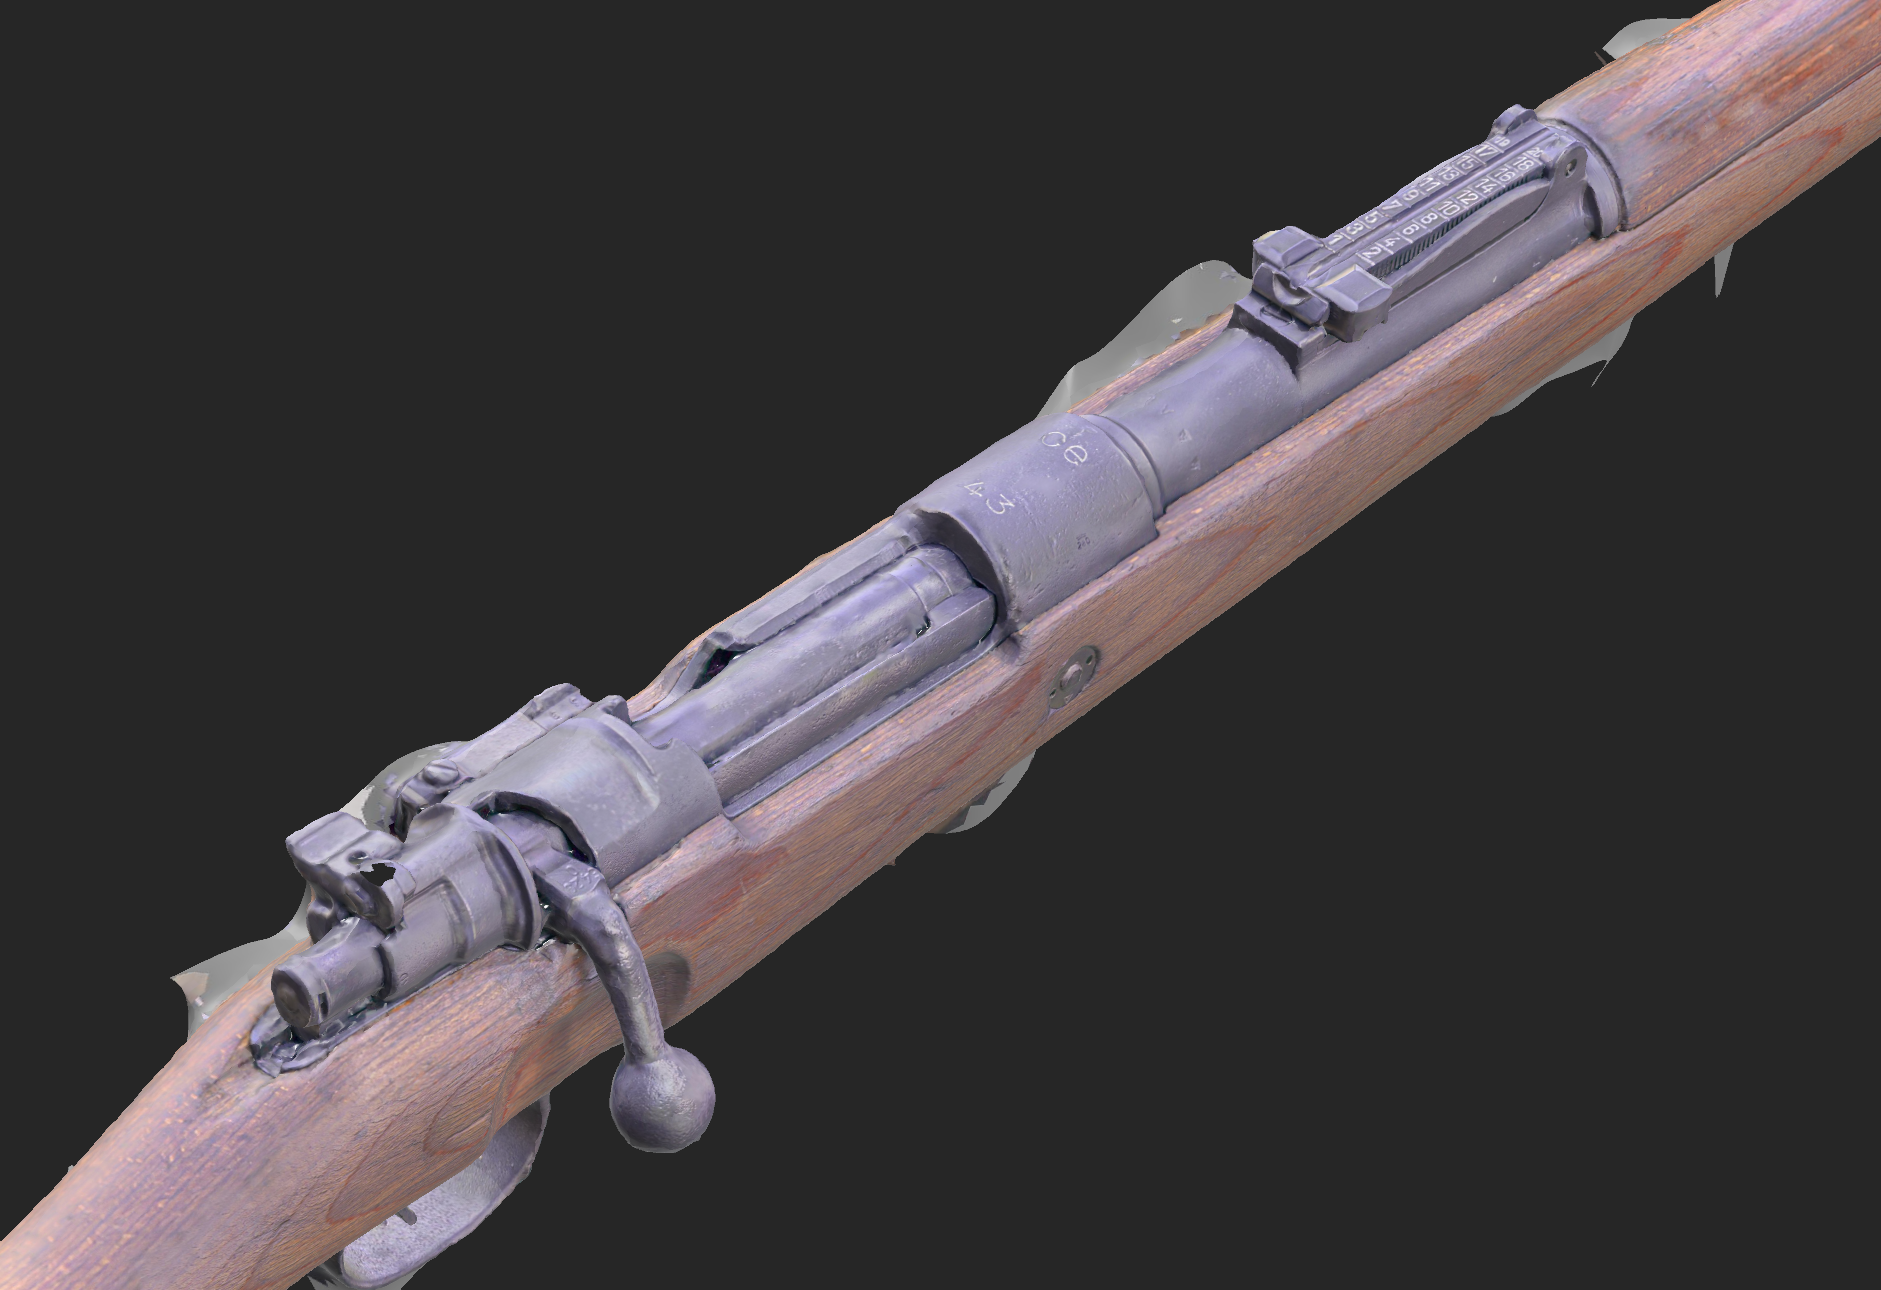
Fourth (Latest) Test - Continued Refinement
With each iteration, I gained a deeper understanding of how Sampler processed the photographs, leading me to conduct another test. This latest test yielded the most complete and detailed mesh thus far in my project. For this test, I made the decision to keep the asset stationary and focused on capturing clear photographs of specific areas of interest.
By maintaining a consistent position for the asset, I could capture detailed shots of features such as the rings, strap holes, and bolt. This approach allowed Sampler to process the images more effectively, resulting in improved accuracy and capturing the intricate details of these specific elements.
The fourth test showcased significant progress and highlighted the importance of experimentation and refining the photography process to achieve the desired outcome in photogrammetry.


I took the time to clean up the decimation of the mesh in Maya, ensuring that it retained its desired level of detail while optimising the geometry for efficient performance. Once the cleanup process was complete, I imported the refined mesh back into Painter.
Similar to the approach taken in the third test, I focused on enhancing the model's appearance by adding roughness and metallic maps in Painter. These additional maps played a crucial role in simulating the PBR material properties of the scanned object, allowing for an accurate representation of how light interacts with different surfaces.
To further enhance the visual quality of the model, I applied sharpening and HSL (Hue, Saturation, and Luminance) filters. These adjustments helped to refine the overall crispness of the textures and colours, resulting in a more polished and visually appealing final result. The combination of meticulous cleanup, material mapping, and post-processing filters contributed to the overall realism and visual impact of the project.
Conclusion, Evaluation, & Next Steps
This is pretty much where I am currently with this project! In conclusion, I have made significant progress with this project, steadily approaching my goal of creating a high-fidelity hero asset through the use of photogrammetry. Each test has brought me closer to achieving the level of detail and realism I am aiming for.
Working with Substance 3D Sampler has been an enjoyable experience, allowing me to explore the capabilities of the software and push its limits. While there are a few features I wish Sampler had, such as an export/import function for texture reprojection or the ability to import a low-poly mesh with its own UVs, the software's intuitive user interface and streamlined workflow have made the process fast and efficient.
Additionally, although the generated mesh was satisfactory, I would appreciate the option to export it and perform further refinements in programs like ZBrush or Maya, before reimporting it as a new basemesh. As a potential workaround, I can explore using Marmoset Toolbag 4 to bake the textures and achieve the desired results. Despite these limitations, Sampler has proven to be a valuable tool for my scanning project.
Looking ahead, I am excited to continue delving into the world of photogrammetry and further refine my pipeline. I would like to thank Laura Vitolina and Nikie Monteleone from Adobe for their support and assistance throughout this project. Their guidance has been invaluable in helping me navigate the intricacies of Sampler and achieve optimal results.